Ok, what came before fell a bit flat, so starting over for 2012 by sharing projects which aim to take the handmade, rather than hand-into-purse, approach to homewares and gift giving!
February 2012:
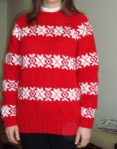
Ok, I actually made something for me this time! February saw the creation of my ‘Killing’ sweater (more details in blog post about this and over on my Ravelry projects pages). Fun to knit and wear and did, compared to the original, save me a fortune that I don’t really have (and even if I did I just don’t think I’d ever be able to justify spending that kind of money on a sweater)! I was at the point of needing a new jumper to keep out the cold though, so the timing was just right for the inspiration on this.
I wasn’t able to spend lots of time each day on it, but spent a while most evenings and in those quiet moments at weekends. Overall it took less than two weeks, mainly because it’s a chunky knit on big needles: the sewing up and finishing the neckline seemed to take forever though!
January 2012:
Something of a quiet month on the doing and making front, due to working / health issues, but I did succeed in completing a Butterfly bag as a birthday gift for a friend. It’s fully lined and with circular handles, for her to use to hold her own knitting / needlecraft projects. The beaded butterfly was knitted separately and sewn on. However, I’ve now bought some brooch backs very cheaply from Ebay, so if I were to make this again I’d make the butterfly as a brooch, so that it could be more versatile!
Week 3/52 Crochet fingerless gloves:
I made pairs of these for two of my nieces for Christmas and one of them has asked me to do another pair for her to give to her friend for her birthday, so there we go, they’re gaining a popular following! So,I made two pairs in the week (they are very easy to do) so that she’s got a colour choice!
Shown here in both colours, yarn is Firenz double knitting from James C Brett. Again, I’m not a pattern writer, so I’m just putting down what I did – if any extra explanation is needed, do ask!
- Using 4mm crochet hook, create chain of 30 sts. Join together at end to create a round.
- Chain 2, then half double crochet (hdc) in each chain from 2nd chain in, slip chain to join at end = 28 hdc sts.
- Repeat for 8 rounds to create cuff (make longer or shorter as needed).
- Swap to 5mm crochet hook (make sts looser and gives more lacy effect particularly with the Firenz yarn).
- Pattern row 1: Chain 3, * treble (tr) into top of next hdc, then treble again into same space; skip next hdc ** then repeat * to ** until the end of the round, slip chain to join end of row.
- Repeat previous row for 5 more rows, working the two trebles in the gap between the two on each previous row (you could work more or less rows here depending on the size needed to take you to the base of the thumb).
- Next row (now working in rows instead of rounds) repeat as before but don’t slip chain to join at end of round,instead chain 3 to turn and work back. Work 4 rows in total this way,then on the fourth row, rejoin to create rounds once more.
- For next row, complete as from pattern row 1 again, for two rows.
So, you have an 8 round cuff, then 6 rounds, 4 rows, 2 rounds.
- To finish top, add a last round in hdc, decreasing if you want to make this top slightly cosier around the fingers.
- To finish glove, hdc around thumb hole for 3 rounds, then tie off (the final number of sts here will depend on how loose or tight you want to make the thumb)!
Week 2/52 My mother’s tea cosy:
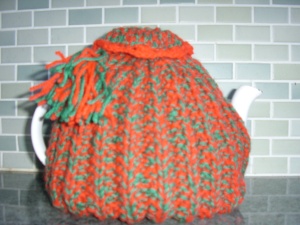
My mum’s been after me to knit her a tea cosy for a bit, so this is what I came up with. Although the colours are resonant of the ghost of the festive period most recently past, the inspiration for the green and red was, quite simply, to match her kitchen!
I should probably point out that I am highly visual and tend to just do – I’m no expert in writing patterns! I’ve written down what I did and referred to an old pattern so that I can explain Shamrock stitch (a real favourite in our family for years!) If it doesn’t make sense, please contact me and I’ll try to help!
Need: 2 balls of DK wool -in this case one red, one green, but you could use any two colours or even the same colour so long as you double the DK strands (or use chunky wool) to make it extra thick!
Instructions are quite general as tea pots can differ quite a bit: it might be a case of adding stitches or reducing / increasing amount of rows knitted to get the perfect size for your pot!
6 mm knitting needles (for doubled DK, or check ball band for needle size if you are using a chunky knit)
All worked in Shamrock stitch, until shaping for top, then works down to k1; p1 rib.
NOTE: if you are adjusting the number of stitches, you will need an odd number for the shamrock stitch.
1st side: cast on 45 sts onto 6 mm needles
Begin Shamrock stitch: each row: k2; p2 to end, k1
Work 30 rows*, then break off yarn, leaving about 2 ins of yarn.
* Or as appropriate for height of tea pot to the top of handle on one side / spout on the other, whichever is the highest. I find between 25 – 30 rows usually does a 2 pint pot: my mum’s needed 30.
2nd side: repeat as for first side.
Row 31: right side of cosy k2; p2 until join of two sides, k2 tog 9across the last stitch from one side and the first stitch on the next0 then continue k2; p2,k1 at end, keeping pattern correct throughout [89 sts]
Row 32 – 36: k2; p2 to end (you may need to adjust how many rows you work here according to your tension or size of pot).
Row 37: decrease 1 stitch every 4-5 sts by K2 tog every 4 -5 sts, depending on keeping the pattern correct
Row 38: k2; p2 to end,k1 – but adjust to keep pattern correct
Keep working in this way, decreasing on right side rows until you have k1, p1, k1 across the whole cosy [45 sts]
Next row: k2 tog across all sts,k1 [23 sts]
Next row: purl
Next row: k2 tog across all sts, k1 [12 sts]
Next row: purl
At this point I had think about how I wanted to finish the cosy, because my mum’s got a strange long piece on the lid of her teapot, which I needed to accommodate with a gap. Ordinarily, I would just pull yarn through remaining sts, create crochet flower or bobble and that’s it, so you might want to do that! If not, what follows is the pattern for the rosette on the top!
Next row (eyelet row) k2,* yfd, k2 tog, k2 – * repeat once more, yfd, k2 tog [12 sts]
Now I reversed the stocking stitch (the knit row, purl row order) so that when the top is flattened out, the right side of the stocking stitch is visible, so:
Next row: knit, then next row: purl
next row: *k1, inc in next st, repeat to end [18 sts]
next row: purl
next row: k1, inc in next st, repeat to end [27 sts]
next row: purl
next row: cast off knitwise
To complete:
- sew up sides leaving the right amount of space on either side to accommodate handle and spout,
- include sewing up the side of the ‘rosette’ on the top
- I then finished this with a simple crochet border in red: *1 sc, miss stitch, 5 tr in next stitch, miss stitch – prepeat from * to end making one round with flower-type border to rosette.
- crochet chain of appropriate length using both colours, add tassels by cutting lengths of both colours and securing to ends of chain. Thread this through eyelets (which should be hidden under the rosette) for the finishing touch!
Week 1 /52 Knitted hat pattern:
I’ve knitted this using a doubled yarn (2 x double knitting) for the black hat for my husband, and for my own I used one ball of double knitting in black alongside a ball of Wendy Frizzante from my stash! I’ve had this Wendy wool for ages and have tried a using it on a couple of other projects but found that it tangles really easily and is very hard to unpick if you go wrong., so I abandoned using it and it’s been lurking in my stash since. However, I love the colour for a hat and scarf and have quite a bit of it, so I thought I’d add it to the black dk and see what happens. Well, it turned out fine and was a lot easier to use having the dk alongside to keep it under control!
Basic pattern:6mm needles and doubled DK wool or a chunky double knit would probably do fine! Knitted in a double rib stitch until shaping then just single rib to end!
Cast on 78 stitches (or enough to give you a good fit, allowing for stretching for snug fit).
Row 1: k2, p2, k2 to end of row (Right side)
Row 2: p2, kd, p2 to end of row
Repeat rows 1 & 2 for approx 20 cm (this may depend on the length of cuff / turn up you want on the hat – we only wanted a small one each so 20cm suited us, if you want longer or have bigger heads you may want to adjust this accordingly!
Now shape the top of the hat as follows:
Next row (would be a row 1): k2 tog, p2 tog, k2 tog to the end of the row (39 stitches)
Next row*: p1; k1; p1 to end
Next row: k1; p1; k1 to end
Repeat last two rows twice more, then repeat this row* once more
Next row: k2 together; repeat for whole row, k1 remaining stitch
Next row: purl
Next row: k2 together; repeat for whole row (10 stitches)
Break off a long length of yarn; thread through remaining 10 stitches and pull tight. Use the long thread to sew or crochet the seam of the hat – I crochet mine as this makes it both firm but flexible in terms of stretching slightly as needed without pulling the edges of the hat.
When using the frizzante with the dk, I crocheted the seam together using the dk only as I find the frizzante makes the seam too bulky (and I find the frizzante too annoying to work with)!
Scarf was knitted with the same doubling of frizzante and black dk, 6mm needles and 34 stitches, plain garter stitch for as long as you want the scarf to be. You could probably get away with 7mm needles and 30 stitches if you want the yarn to go a bit father and the scarf to be of a looser knit. Mine’s come up quite thick and felty, because I love to be snug! Add fringing in both colours as desired (scarf can easily be left without fringing if you want)!


